Sunday, June 29, 2008

Danish Braid (DB)

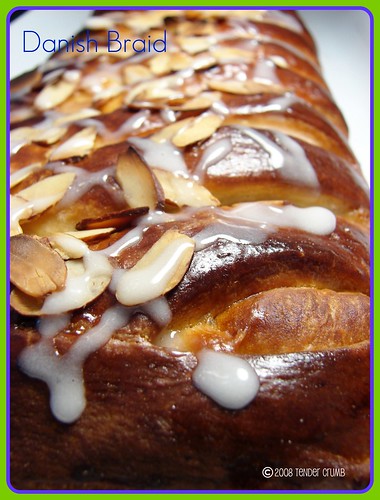
Let's talk about rolling up my sleeves for my very first Daring Bakers challenge! For me, my goal in joining this fabulous baking group is to work with recipes that are typically out of my comfort zone. I was thrilled to see Danish Braid as this month's selection! I'll admit that I am the type to read these more complicated recipes, admire the pretty pictures, and make some excuse to not make the recipe. Now, I don't have an excuse! :)

Like making croissants and puff pastry, laminated dough is a time and labor intensive exercise. The first time I made croissants and puff pastry was in a pastry class this past winter, and I had to make both doughs one handed (I had broken my wrist a few weeks prior, so was in a cast....I finished a sweaty, floury mess, but the final baked items turned out pretty good! :)) I was happy to dive into this recipe...two handed!

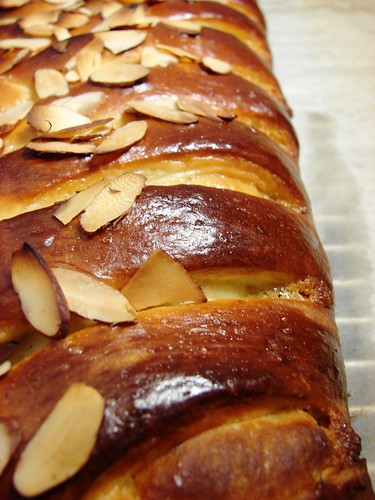
The trick is allocating enough time for the turns, resting and proofing. I started the dough Friday evening (the bonus is cooling temps to work with the dough) , finishing all four turns and preparing the filling before turning in for the evening. The next morning, I assembled the braid and baked it off. The beautiful thing about this recipe is that your hard work is rewarded with a GORGEOUS looking pastry that tastes better than anything you would find at the corner bakery.

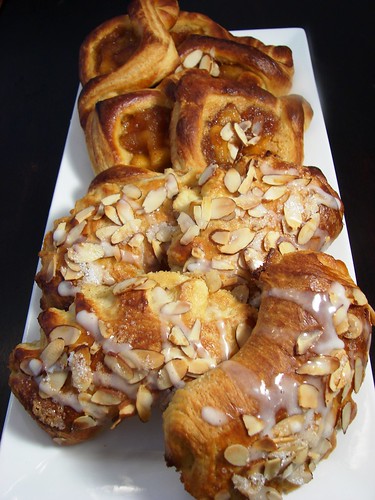
This recipe yielded enough dough for two braids. Instead of making a second braid, I opted to make some smaller pastries. 
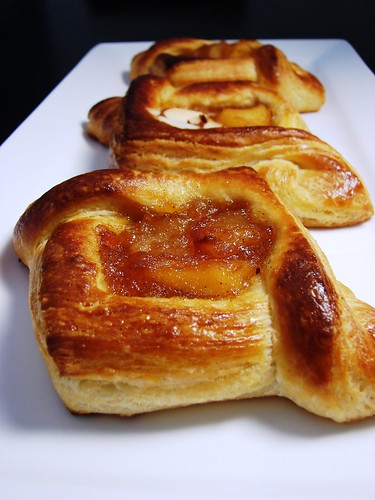
With some of the dough, I made triangle twists and used the leftover apple mixture as the filling. I really love the beautiful shape, and the best part was that it was very easy to assemble!
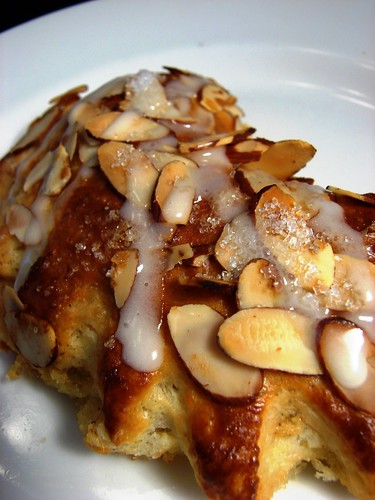
I also made bear claws, which was filled with a traditional remonce (almond filling)--- recipe is at the very end of this post). This was my absolute favorite pastry. The smell of the almond filling baking in the oven was intoxicating, and the pastry was light, fluffy and delicious.
~~~~~~~~~~~~~~~~~~~~~~~~~~~~~~
DANISH DOUGH
Makes 2-1/2 pounds dough

Ingredients

For the dough (Detrempe)
1 ounce fresh yeast or 1 tablespoon active dry yeast
1/2 cup whole milk
1/3 cup sugar
zest of 1 orange, finely grated
3/4 teaspoon ground cardamom
1-1/2 teaspoons vanilla extract
1/2 vanilla bean, split and scraped
2 large eggs, chilled
1/4 cup fresh orange juice
3 1/4 cups all-purpose flour
1 teaspoon salt

For the butter block (Beurrage)
1/2 pound (2 sticks) cold unsalted butter
1/4 cup all-purpose flour

DOUGH
- Combine yeast and milk in the bowl of a mixer fitted with the paddle attachment and mix on low speed. Slowly add sugar, orange zest, cardamom, vanilla extract, vanilla seeds, eggs, and orange juice. Mix well.
- Change to the dough hook and add the salt with the flour, 1 cup at a time, increasing speed to medium as the flour is incorporated. Knead the dough for about 5 minutes, or until smooth. You may need to add a little more flour if it is sticky.
- Transfer dough to a lightly floured baking sheet and cover with plastic wrap. Refrigerate for 30 minutes.
(Without a standing mixer: Combine yeast and milk in a bowl with a hand mixer on low speed or a whisk. Add sugar, orange zest, cardamom, vanilla extract, vanilla seeds, eggs, and orange juice and mix well. Sift flour and salt on your working surface and make a fountain. Make sure that the “walls” of your fountain are thick and even. Pour the liquid in the middle of the fountain. With your fingertips, mix the liquid and the flour starting from the middle of the fountain, slowly working towards the edges. When the ingredients have been incorporated start kneading the dough with the heel of your hands until it becomes smooth and easy to work with, around 5 to 7 minutes. You might need to add more flour if the dough is sticky.)

BUTTER BLOCK
- Combine butter and flour in the bowl of a mixer fitted with a paddle attachment and beat on medium speed for 1 minute. Scrape down the sides of the bowl and the paddle and then beat for 1 minute more, or until smooth and lump free. Set aside at room temperature.
- After the detrempe has chilled 30 minutes, turn it out onto a lightly floured surface. Roll the dough into a rectangle approximately 18 x 13 inches and ¼ inch thick. The dough may be sticky, so keep dusting it lightly with flour. Spread the butter evenly over the center and right thirds of the dough. Fold the left edge of the detrempe to the right, covering half of the butter. Fold the right third of the rectangle over the center third. The first turn has now been completed. Mark the dough by poking it with your finger to keep track of your turns, or use a sticky and keep a tally. Place the dough on a baking sheet, wrap it in plastic wrap, and refrigerate for 30 minutes.
- Place the dough lengthwise on a floured work surface. The open ends should be to your right and left. Roll the dough into another approximately 13 x 18 inch, ¼-inch-thick rectangle. Again, fold the left third of the rectangle over the center third and the right third over the center third. No additional butter will be added as it is already in the dough. The second turn has now been completed. Refrigerate the dough for 30 minutes.4. Roll out, turn, and refrigerate the dough two more times, for a total of four single turns. Make sure you are keeping track of your turns. Refrigerate the dough after the final turn for at least 5 hours or overnight. The Danish dough is now ready to be used. If you will not be using the dough within 24 hours, freeze it. To do this, roll the dough out to about 1 inch in thickness, wrap tightly in plastic wrap, and freeze. Defrost the dough slowly in the refrigerator for easiest handling. Danish dough will keep in the freezer for up to 1 month.

APPLE FILLING
Makes enough for two braids

Ingredients
4 Fuji or other apples, peeled, cored, and cut into ¼-inch pieces
1/2 cup sugar
1 tsp. ground cinnamon
1/2 vanilla bean, split and scraped
1/4 cup fresh lemon juice
4 tablespoons unsalted butter

Toss all ingredients except butter in a large bowl. Melt the butter in a sauté pan over medium heat until slightly nutty in color, about 6 - 8 minutes. Then add the apple mixture and sauté until apples are softened and caramelized, 10 to 15 minutes. If you’ve chosen Fujis, the apples will be caramelized, but have still retained their shape. Pour the cooked apples onto a baking sheet to cool completely before forming the braid. (If making ahead, cool to room temperature, seal, and refrigerate.) They will cool faster when spread in a thin layer over the surface of the sheet. After they have cooled, the filling can be stored in the refrigerator for up to 3 days. Left over filling can be used as an ice cream topping, for muffins, cheesecake, or other pastries.


DANISH BRAID
Makes enough for 2 large braids

Ingredients
1 recipe Danish Dough (see above)
2 cups apple filling, jam, or preserves (see above)
egg wash (1 large egg, plus 1 large egg yolk)

- Line a baking sheet with a silicone mat or parchment paper. On a lightly floured surface, roll the Danish Dough into a 15 x 20-inch rectangle, ¼ inch thick. If the dough seems elastic and shrinks back when rolled, let it rest for a few minutes, then roll again. Place the dough on the baking sheet.
- Along one long side of the pastry make parallel, 5-inch-long cuts with a knife or rolling pastry wheel, each about 1 inch apart. Repeat on the opposite side, making sure to line up the cuts with those you’ve already made.
- Spoon the filling you’ve chosen to fill your braid down the center of the rectangle. Starting with the top and bottom “flaps”, fold the top flap down over the filling to cover. Next, fold the bottom “flap” up to cover filling. This helps keep the braid neat and helps to hold in the filling. Now begin folding the cut side strips of dough over the filling, alternating first left, then right, left, right, until finished. Trim any excess dough and tuck in the ends.
- Egg Wash: Whisk together the whole egg and yolk in a bowl and with a pastry brush, lightly coat the braid.

Proofing and Baking
- Spray cooking oil onto a piece of plastic wrap, and place over the braid.
- Proof at room temperature or, if possible, in a controlled 90 degree F environment for about 2 hours, or until doubled in volume and light to the touch.
- Near the end of proofing, preheat oven to 400 degrees F. Position a rack in the center of the oven.3. Bake for 10 minutes, then rotate the pan so that the side of the braid previously in the back of the oven is now in the front. Lower the oven temperature to 350 degrees F, and bake about 15-20 minutes more, or until golden brown.
- Cool and serve the braid either still warm from the oven or at room temperature. The cooled braid can be wrapped airtight and stored in the refrigerator for up to 2 days, or freeze for 1 month.
~~~~~~~~~~~~~~~~~~~~~~~~~~~~~~~~~~~~~~~
Remonce (Almond Cream Filling)
Adapted from The Pie and Pastry Bible by Rose Levy Beranbaum

Ingredients
3 tbsp almond paste
1/4 C + 1 1/2 tsp sugar
4 tbsp butter
1 egg, room temp and slightly beaten
1/2 tsp vanilla
1 tbsp + 1 1/2 tsp flour

In a food processor, pulse together the almond paste and sugar until it looks like wet sand. Add butter and pulse 3-4 times until incorporated. Add the egg, vanilla, and flour and pulse just until incorporated. It will be a soft cream. Place in a piping bag and refrigerated until it is used (otherwise it may ooze from the pastry when baking)

Tuesday, June 24, 2008

Peach Blackberry Cobbler & Crisp (TWD)

It was a friggin' hot this weekend in So Cal!!! I'll be the first to admit it...I'm a total weather wimp...anything that deviates from a sunny and temperate 75-80 degrees constitutes a climate crisis! We tried to be good citizens and not keep our air conditioning going around the clock to conserve electricity. One way to keep our house cool this weekend was to not cooking indoors (fruity, frosty cocktails by the pool didn't hurt either). The nice by product of our conservation efforts was doing a lot of great grilling on the barbeque. I almost made it through the entire weekend without turning on the range/oven...

This week's Tuesdays With Dorie selection, Mixed Berry Cobbler, was selected by Beth at Our Sweet Life. I missed out on making the peppermint cream puff ring last week, and was thinking of bailing this week as this recipe involved turning on the oven. I quickly changed my mind when I was at the farmers market, as I was inspired by all of the juicy and fragrant peaches, and decided to go for it and make a mini-cobbler.... and I'm so glad I did! Besides, the group is so much fun to bake with, I couldn't miss out on the action!


I don't frequently make or eat cobbler. I'm more of a fruit crisp person, as I like the flavor and crunch of the brown sugar, oats and nuts in a crisp topping. As I had extra fruit filling, I went ahead and made a mini crisp...after all, I had to put my taste buds to the test!

I decided to pass on the berries. Instead, I went with fresh peaches and blackberries, and put my own spin on the filling:

Fruit Filling
(this is enough for a 9x13" pan. I only used a quarter of the recipe to fill 2 small ramekins)
- 4 C peaches, large dice (if you cut up peaches too small, they will disentigrate when baking)
- 1 1/2 C blackberries
- 1/8 C honey
- 1/8 C maple syrup
- 1 tbsp lemon juice
- 1-2 tbsp quick tapioca (depending on juiciness of fruit)
- 2 tsp cinnamon
- 1/2 tsp nutmeg
- 1/4 tsp almond extract
- dash of salt

I prepared the topping as written, but quartered the recipe. I did add just a 1/8 tsp of cinnamon for a little spice. The mini cobbler only took 22 minutes to finish in the oven at 375 degrees.

I was a little worried by the initial feedback about this recipe, but I really enjoyed the final product! I thought the topping had a nice flakey, crunchy biscuit texture and I didn't think it was too doughy or bland. I think of cobbler toppings as a vehicle to highlight the fruit, so I'm glad that it didn't overwhelm the delicious peach and blackberry filling. Also, perhaps it's a function of the topping, but I also liked that the blackberries held their shape and didn't disentigrate (it was a whole diffent story on the crisp...read on below).


I had some mascarpone ice cream in the freezer, and it was a decadent experience to have this creamy delight melt into the still-warm cobbler.


As mentioned above, I also made a mini-crisp, using the same fruit filling. For the topping, I went with my standby recipe, which follows below (only used a quarter of the recipe and still have some leftover):

Fruit Crisp Topping (makes enough to top a 9x13" pan)

- 6 tbsp butter
- 1/2 C flour
- 1 C quick oats
- 3/4 C brown sugar
- 1 tsp cinnamon
- dash of salt
- 1/2 C sliced almonds

Combine the dry ingredients, then using your fingers incorporate int the butter. Do not overmix, as the mixture should have a crumbly texture. Crumble on top of fruit filling. The mini-crisp took 22 minutes to bake at 375 degrees.

I loved the texture of the crunchy topping with the warm syrupy fruit underneath. Unlike the cobbler, the blackberries kinda exploded and disentigrated into the peaches, creating a reddish pink filling. Tastewise, the fruit was just as flavorful.

So, has this week's experience changed my love for fruit crisps? Not exactly, but I'm willing to give this cobbler recipe another chance in the near future. If you're interesting in taking this recipe for a spin, Dorie Greenspan shares the original recipe for Mixed Berry Cobbler here. To see more delicious cobbler creations, check out the Tuesdays With Dorie blogroll.

Sunday, June 22, 2008

Double Chocolate Layer Cake - aka THAT Chocolate Cake

As mentioned in my previous post, I've been busy baking for my hubby's birthday this week. I asked Mr. B what he wanted kind of cake he wanted for his birthday. He simply responded "I want THAT chocolate cake". Okay, I have many different cakes in my baking arsenal, but I knew exactly what he was referring to. A few years back, I found the recipe for THAT chocolate cake aka double chocolate layer cake on epicurious.com. 
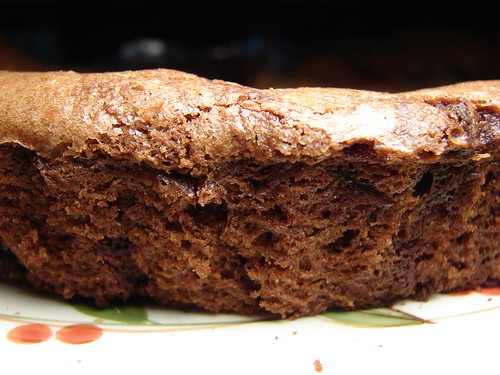
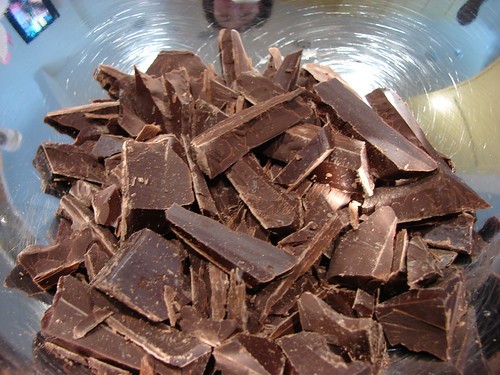
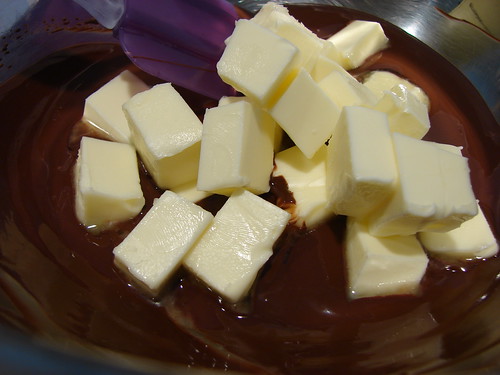
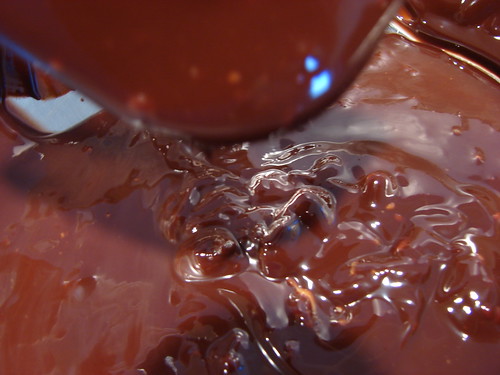
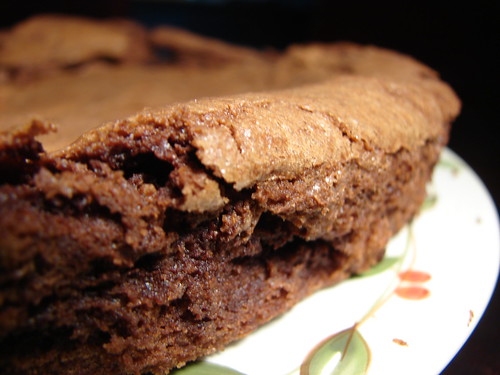
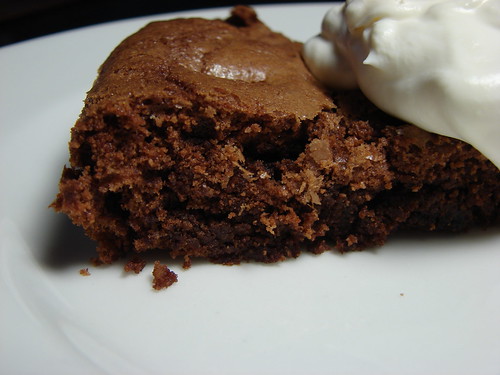
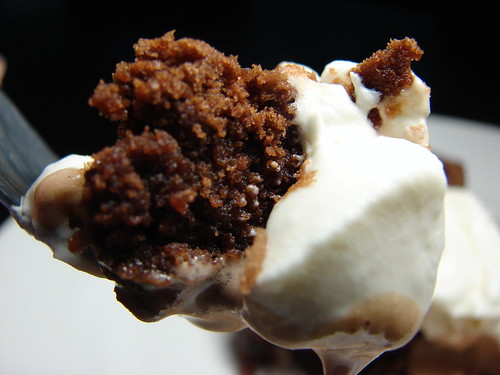
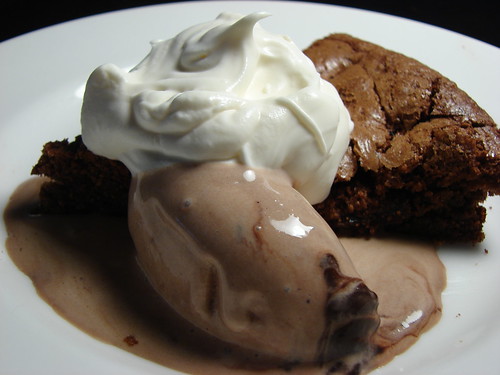
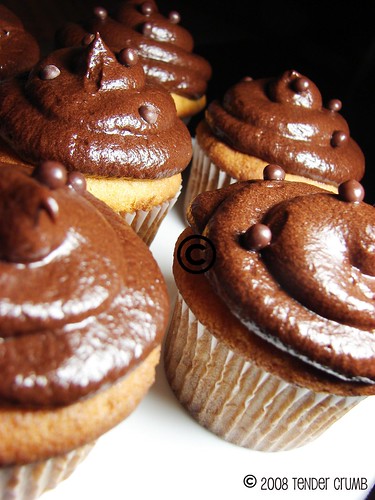
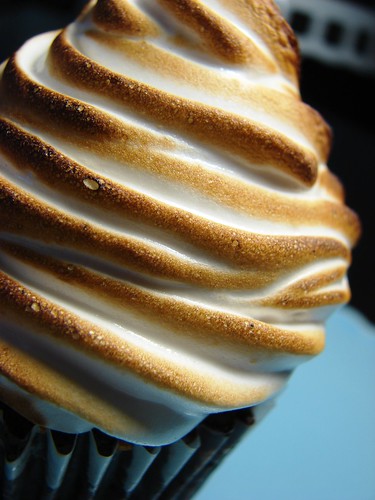
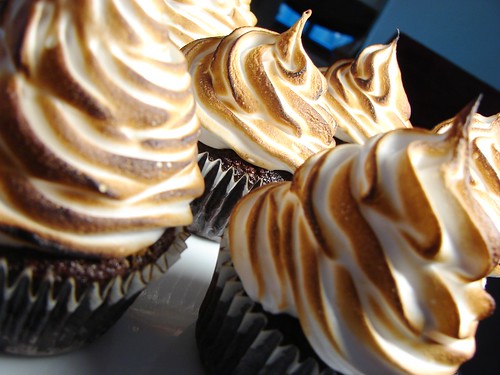
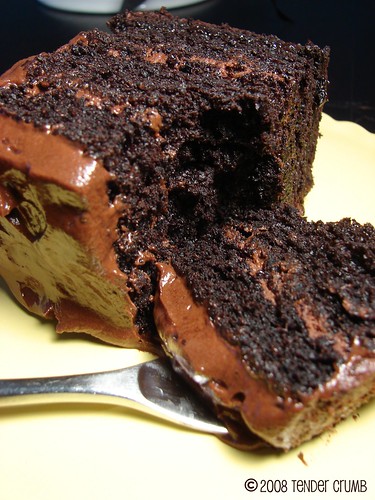
When I first tried this recipe, I had concerns as I'm not that crazy about cake recipes that use oil as its fat source (really much prefer using butter for its flavor). With the intense flavors of chocolate, cocoa powder and coffee, the flavor of the cake is intensely chocolatey, and you don't miss the butter at all. The cake is extremely moist, but it doesn't have the tight crumb that you get from butter based recipes. The accompanying ganache recipe is fine to use, but I do like varying the frosting for this cake. My only adjustment to the original recipe is using bittersweet chocolate in place of the semi-sweet for the cake and frosting.

Clearly, Mr. B is in good company as this is the site's most popular cake recipe and has received rave reviews...over a 1,100+ reviews for this single recipe, which is insane! You will now have to excuse me, as I'm going to pour my self a tall glass of milk and enjoy a slice of this cake! :)

Friday, June 20, 2008

Banana Cupcake w. Chocolate Buttercream

Happy Birthday Mr. B!!!! My hubby is such a huge supporter of my baking endeavors (as well as everything else in my life), and it is only fitting for me to dedicate my baking time this week to him. His dessert cravings are pretty simple and straightforward --- chocolate...and more chocolate. Of course I am happy to oblige!

I wanted him to start his special day with some cupcakes to share with his colleagues at work. One of my favorite banana cake recipes comes from Dorie Greenspan's Baking From My Home To Yours. This recipe is usually made in a bundt pan, but it translates nicely into cupcakes. Unlike a lot of other banana cake/bread recipes, this cake isn't overly dense, and has a light texture and is very moist.

If you are interested in making this recipe, Dorie has written about this recipe at Serious Eats. Please note that this link makes a half batch. The recipe I used is from Dorie's cookbook and is a full batch. My only modification to the full batch recipe is to add 1 1/2 tsp cinnamon and 1/2 tsp nutmeg, and increase the vanilla extract to 2 tsp. I yielded 28 cupcakes from the recipe.

For the chocolate frosting, I stumbled onto this delicious chocolate buttercream recipe on Joy The Baker's blog. The unexpected ingredient in this recipe is Ovaltine, and I couldn't resist trying this out. I made the buttercream as written, but did cut back on the powdered sugar by 1 cup (as it seemed to be a bit much). I loved the light, creamy texture, and enjoyed the malt flavor from the Ovaltine. This is a terrific recipe!

The combination of the banana cake and the chocolate buttercream was absolutely delicious. Most importantly, I got a huge thumbs up from my birthday boy! :)

Saturday, June 14, 2008

Chocolate Graham Cupcakes With Toasted Marshmallow

This weekend, my dear friend Melissa and I were indulging in a spa day to celebrate her birthday, and I wanted to make Melissa a special treat to mark her special day. There is nothing more decadent that getting totally pampered and topping the day with a decadent treat!

I love making this cupcake as much as people love receiving and eating them. What's not to love --- a graham base, a rich chocolate cake, and a fluffy toasted marshmallow topping. I love making it as it gives me an excuse to create that delicious fluffy marshmallow topping and toasting it with my blowtorch!


I've previously posted on this receipe, which you can find here. I've gotten a teensy bit better with my photography thanks to the discovery of the macro button on my camera, so be kind to my old photos! :)

Tuesday, June 10, 2008

La Palette's Strawberry Tart w. Mascarpone Ice Cream (TWD)

This week’s Tuesdays With Dorie selection, La Palette’s Strawberry Tart, comes courtesy from Marie at A Year From Oak Cottage. This selection couldn’t have come at a better time, as my local farmers market is teeming with a wide array of gorgeous fruit. There were so many choices that I had a hard time deciding what to buy: gaviota strawberries or golden raspberries, blackberries or yellow peaches, blueberries or plums? Previously, my answer would have been “all of the above”. I would bring home so much fruit that my bewildered hubby would ask what mob I was planning to feed (at home it is just the two of us). Exercising some self control this time, I whittled my choices down to two: gaviota strawberries and blackberries.


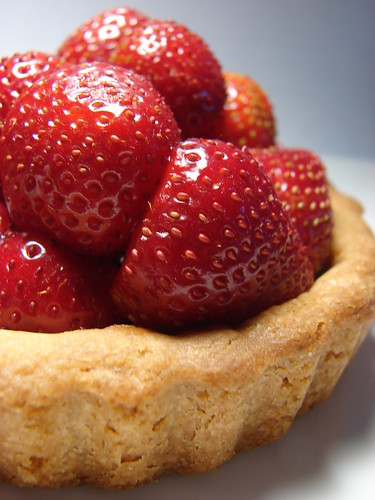
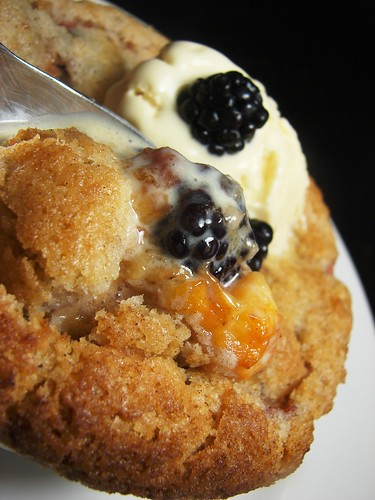
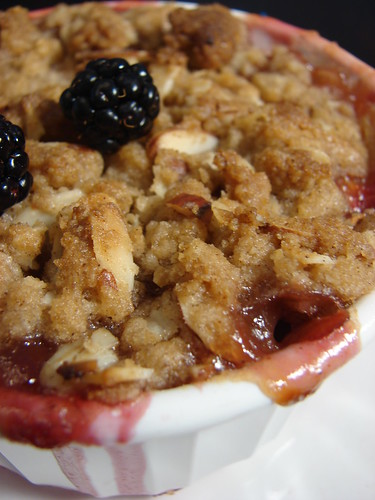
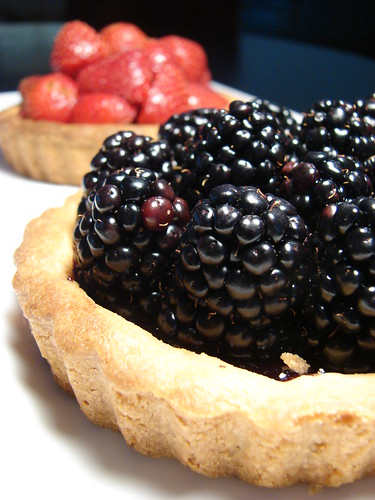
I LOVED this recipe, as we had the opportunity to improvise as much as we wanted to suit individual tastes. Aside from baking the tart shell, this was an exercise of assembling the components (which left me more time to enjoy my weekend!). Here is my take on the recipe:

- Instead of using large tart pan, I went with two individual tartlette pans. I ended up making the full tart shell recipe, using half and freezing the other half.
- Blackberry and strawberry jams were used for the base.
- I didn’t bother tossing the fruit in sugar as both berries was perfectly ripe and super-sweet. I did sprinkle some blackberry liqueur on the blackberries and put a few drops of really good, aged balsamic vinegar on the strawberries (This is a DELICIOUS combination --- the balsamic really enhances the sweetness of the berries. Make sure to use a high quality, aged balsamic vinegar)
- Omitted the black pepper.
- Instead of crème fraiche/whipped cream, mascarpone ice cream stepped in to accompany the tart. This delicious ice cream is a twist on a crème fraiche version featured in David Lebovitz’s The Perfect Scoop (the recipe is below). As I have plenty of ice cream left, I need to figure out what to do with the rest of the ice cream (tiramisu bombe, ice cream sandwich, affogato, more tartlettes?). I promise to post on this later.

Overall, this is a really terrific recipe! The strawberry tart definitely took an Italian turn with the balsamic and mascarpone, and the blackberry version was a perfect balance of tart and sweet. The crunchy shortbread-like crust and juicy berries were nicely complemented by the creamy, not over-the-top sweet ice cream. This tart recipe will be making many appearances at my house this summer!

Often, the best desserts are the simplest ones, and I’m glad we didn’t overlook this delicious recipe. Dorie Greenspan highlighted this recipe last summer at Serious Eats, so if you’re interested in creating this yourself (I highly encourage you to do so), here is the link. To check out the yummy creations of my fellow bakers, check out Tuesdays With Dorie.


Mascarpone Ice Cream
Adapted from The Perfect Scoop by David Lebovitz
Makes 1 Quart


Ingredients
1 C whole milk
3/4 C vanilla sugar
pinch of salt
5 large egg yolks
2 C mascarpone

- Warm the milk, sugar, and salt in a medium saucepan. In a separate bowl, whisk together the egg yolks. Slowly pour the warm milk into the egg yolks, whisking constantly, then pour the warmed egg yolks back into the saucepan.
- Stir the mixture constantly over medium heat until it thickens. If you're using a candy thermometer, warm the mixture to 170F. Pour the custard through a strainer and stir until cool over an ice bath. Chill thoroughly in the refrigerator.
- Once cool, whisk in the mascarpone, then freeze in an ice cream maker.

Tuesday, June 3, 2008

French Chocolate Brownies (TWD)

This weeks Tuesdays With Dorie selection French Brownies comes to us courtesy of Di at Di's Kitchen Notebook . Now, I don't know of anyone who doesn't appreciate the rich decadence and deep chocolatey flavor of a brownie. From these brownie aficianados, there are definite opinions on texture (cakey vs. fudgy), type of chocolate (semi-sweet vs bittersweet), and additions (choc chips, nuts, or no additions). Let's start by saying that I am of the cakey, bittersweet, no addition camp.


For me, the most important ingredient in any brownie recipe is the chocolate. I always try to find the best quality chocolate, as it will dictate the flavor of the final product. I love using the Valrhona brand, and there is always a block on hand at my house for these baking occasions! BTW, this was the first time I attempted taking pictures during the preparation work...the key word here is "attempted", as I didn't fare too well with blurry pictures and messy hands. This was a lot harder that I assumed, so I commend all of you who do this on a regular basis!


The technique for this recipe is definitely different from a traditional brownie, as it requires beating the sugar and eggs in a mixer before folding in the other ingredients. I suspect that the light, flaky, cakey texture results from this process. The only substitution I made to the original recipe was to switch out rum raisins with cognac soaked dried cherries.


I used a 9" tart pan in lieu of an 8" square pan, and ended up with a thinner layer. I don't know about everyone else, but I had challenges unmolding the brownie from the pan, as the texture was so delicate. Still, there is something really charming about the cracked top and rustic "free form" of this brownie.


The verdict? I really liked the light cakey texture and the deep chocolatey flavor. It wasn't overwhelmingly rich like other brownie recipes ...for me that is a wonderful thing! Also, I really enjoyed the addition of the dried fruit. The tartness and slight chewiness of the cherries serves as a nice contrast to the deep chocolate flavor and tender crumb of the brownie.


Dorie suggests that this brownie goes well with some accompaniments like whipped creme fraiche or whipped cream, ice cream or chocolate sauce --- or all three! I served this brownie with vanilla whipped cream and a homemade chocolate malted ice cream (I will post separately on the ice cream), and I have to say that the combination was heavenly! If you're interested in trying this out (which I wholeheartedly recommend), the recipe is below. Also, check out what my fellow bakers are doing at Tuesdays With Dorie.


French Chocolate Brownies
Adapted from Baking From My Home to Yours by Dorie Greenspan
Makes 16 brownies


Ingredients
1/2 cup all-purpose flour
1/8 teaspoon salt
1/8 teaspoon cinnamon (optional)
1/3 cup raisins, dark or golden
1 1/2 tablespoons water
1 1/2 tablespoons dark rum
6 ounces bittersweet chocolate, finely chopped
1 1/2 sticks (12 tablespoons; 6 ounces) unsalted butter, at room temperature and cut into 12 pieces
3 large eggs, at room temperature
1 cup sugar

Getting ready:
Center a rack in the oven and preheat the oven to 300°F.

Line an 8-inch square baking pan with foil, butter the foil, place the pan on a baking sheet, and set aside.

Whisk together the flour, salt and cinnamon, if you're using it.

Put the raisins in a small saucepan with the water, bring to a boil over medium heat and cook until the water almost evaporates. Add the rum, let it warm for about 30 seconds, turn off the heat, stand back and ignite the rum. Allow the flames to die down, and set the raisins aside until needed.

Put the chocolate in a heatproof bowl and set the bowl over a saucepan of simmering water. Slowly and gently melt the chocolate, stirring occasionally. Remove the bowl from the saucepan and add the butter, stirring so that it melts. It's important that the chocolate and butter not get very hot. However, if the butter is not melting, you can put the bowl back over the still-hot water for a minute. If you've got a couple of little bits of unmelted butter, leave them—it's better to have a few bits than to overheat the whole. Set the chocolate aside for the moment.

Working with a stand mixer with the whisk attachment, or with a hand mixer in a large bowl, beat the eggs and sugar until they are thick and pale, about 2 minutes. Lower the mixer speed and pour in the chocolate-butter, mixing only until it is incorporated—you'll have a thick, creamy batter.

Add the dry ingredients and mix at low speed for about 30 seconds—the dry ingredients won't be completely incorporated and that's fine. Finish folding in the dry ingredients by hand with a rubber spatula, then fold in the raisins along with any liquid remaining in the pan.

Scrape the batter into the pan and bake 50 to 60 minutes, or until the top is dry and crackled and a knife inserted into the center of the cake comes out clean. Transfer the pan to a rack and allow the brownies to cool to warm or room temperature.

Carefully lift the brownies out of the pan, using the foil edges as handles, and transfer to a cutting board. With a long-bladed knife, cut the brownies into 16 squares, each roughly 2 inches on a side, taking care not to cut through the foil.

Serving: The brownies are good just warm or at room temperature; they're even fine cold. I like these with a little something on top or alongside—good go-alongs are whipped crème fraiche or whipped cream, ice cream or chocolate sauce or even all three!

Storing: Wrapped well, these can be kept at room temperature for up to 3 days or frozen for up to 2 months.

Sunday, June 1, 2008

Red Velvet Cupcakes

In Los Angeles, cupcakes are ubiquitous. Every bakery you visit showcases a wide array of flavors and presentations. Red velvet is a flavor that every bakery replicates, and there is huge debate on which is the best. From what people shared with me, they delight in the shocking, totally unnatural red color and savor the delicate flavor of the cake and rich frosting.

I like red velvet, but I can't say that I love it, as I think that there are so many other delicious flavors to invest my calories in. Thus, I have never had a deep desire to bake a red velvet cake.

This weekend, I planned on baking cupcakes for a colleague at work to celebrate her birthday. This was the perfect excuse to try out a red velvet recipe! I did some extensive researching on the internet (boy o boy, people are really passionate about what makes the perfect red velvet cake!) and decided to go for this recipe at Food Network.


The verdict on this first try--- I liked the flavor of the moist crumb of the cake. The cream cheese frosting goes really well with the cake.


Colorwise, I don't think I put enough red food coloring (red velvet calls for an alarming amount of red food coloring), so I ended up with maroon velvet. Regardless, with some fresh berries on top, they made for some cute cupcakes. I hope my co-workers will agree!
Blog Widget by LinkWithin